
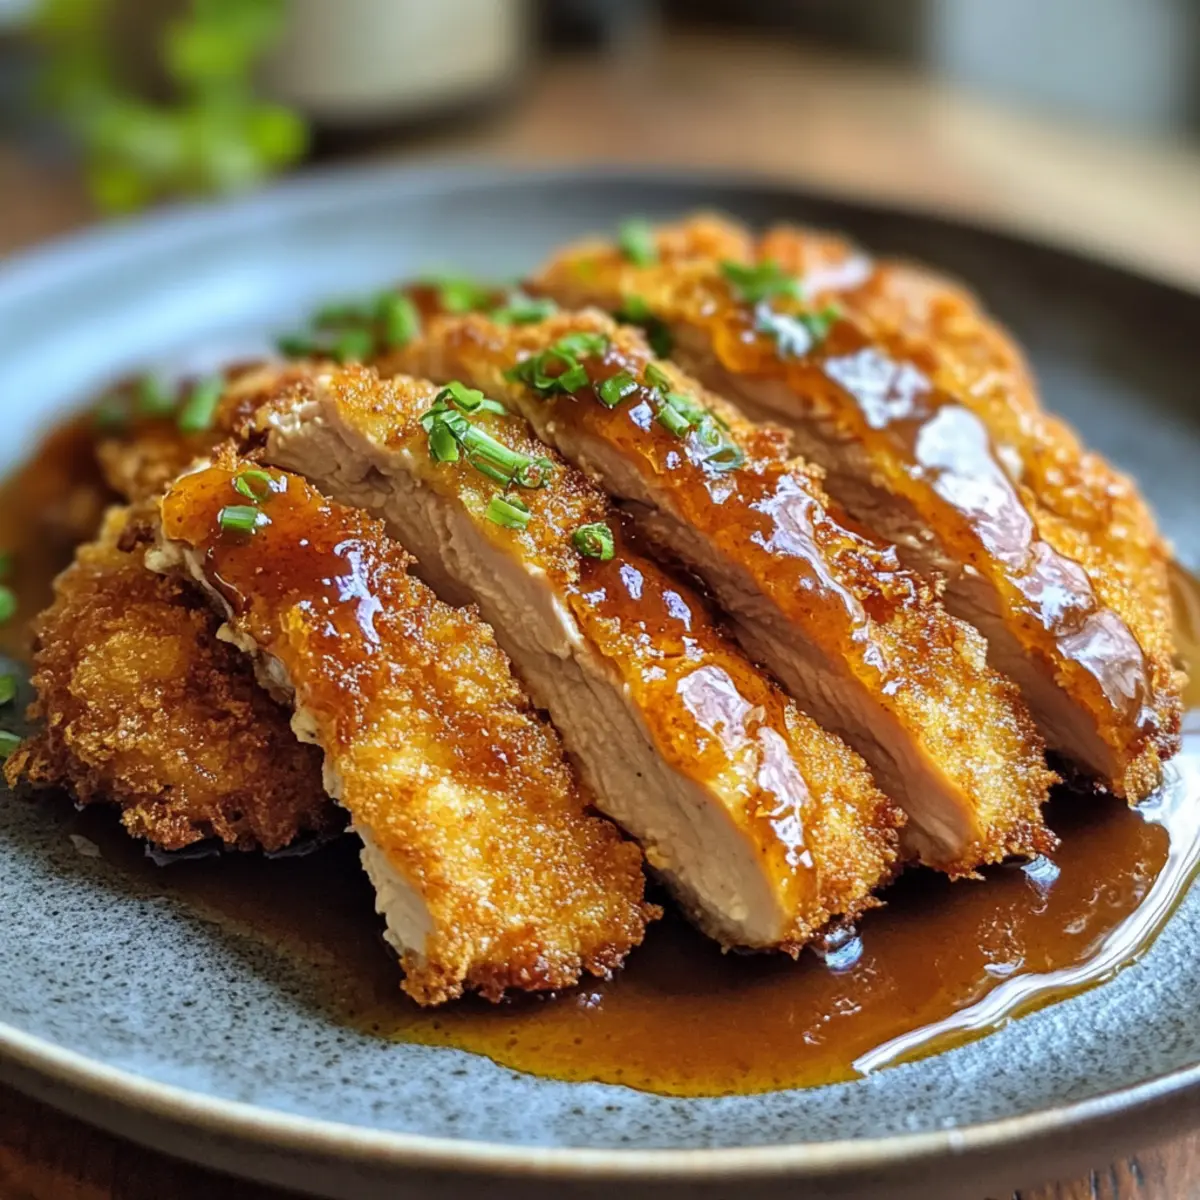
When the craving for something crispy and flavorful hits, I love reaching for this Crunchy Oven-Baked Chicken Katsu Recipe. The first bite transports you to a cozy Japanese eatery, where each crunchy piece is paired with a drizzle of that sweet and tangy tonkatsu sauce. The best part? It’s healthier than its fried counterpart, making it a guilt-free indulgence for any night of the week.
As the chicken bakes in the oven, an irresistible aroma fills the kitchen, tempting everyone to gather around the table. This dish not only promises a satisfying crunch with each bite but also offers the flexibility to switch out proteins and sauces, ensuring there’s a version for every palate. So, why settle for fast food when you can recreate this delightful classic at home with minimal effort? Let’s dive into this easy and delicious recipe that’s destined to become a family favorite!
Why is the Crispy Oven-baked Chicken Katsu Recipe a Must-Try?
Flavor-packed goodness: Each bite of this katsu is bursting with savory tones from the crispy panko breadcrumbs paired with sweet tonkatsu sauce.
Healthier alternative: Enjoy the crunch of fried chicken without the guilt; this oven-baked method significantly reduces fat while maintaining flavor.
Quick & easy: Ideal for busy weeknights, this recipe comes together swiftly, making dinner stress-free and enjoyable.
Versatile options: Easily swap chicken for pork or tofu, and get creative with sauces like spicy mayo or teriyaki for an exciting twist.
Crowd pleaser: Whether for family dinners or casual gatherings, this dish is sure to impress everyone at the table.
Crispy Oven-Baked Chicken Katsu Ingredients
Discover the essential ingredients for the Crispy Oven-Baked Chicken Katsu Recipe that will make your meal a delicious delight!
For the Chicken
- Boneless Skinless Chicken Breasts – This primary protein should be about 3-4 breasts for ample servings; adjust based on your needs.
For the Coating
- Panko Breadcrumbs – These create the uniquely crunchy texture; they can be found in Asian markets or the international aisle.
- All-Purpose Flour – Used for dredging to create a light coating; any type works, but simplicity is key.
- Eggs – Two large eggs help ensure the breadcrumbs stick to the chicken perfectly.
- Salt and Pepper – Essential seasonings to enhance flavor; don’t skimp on these important ingredients!
For the Sauce
- Tonkatsu Sauce – This must-have sauce elevates katsu to new heights with its sweet and savory profile, making it essential for authentic flavor.
Explore these ingredients and embrace the joy of creating your very own Crispy Oven-Baked Chicken Katsu Recipe!
How to Make Crispy Oven-Baked Chicken Katsu
-
Preheat Oven: Begin by preheating your oven to 400°F (200°C). This ensures an even baking temperature for your chicken katsu. Don’t forget to spray a baking sheet with nonstick cooking spray to prevent sticking!
-
Prepare Chicken: Season your boneless, skinless chicken breasts liberally with salt and pepper. For an even cook, consider gently pounding them to an equal thickness. This helps the chicken cook perfectly throughout.
-
Set Up Dredging Station: Gather three shallow dishes and arrange them in this order: flour in the first, whisked eggs in the second, and panko breadcrumbs in the third. This makes the coating process smooth and fun!
-
Coat Chicken: Start by dipping each chicken breast into the flour, ensuring it’s well coated. Next, transfer it to the egg wash, letting excess drip off, and finally coat it in panko breadcrumbs, pressing lightly for better adherence.
-
Bake: Lay the coated chicken breasts in a single layer on your prepared baking sheet. Bake for 20-25 minutes until they’re golden brown. Use a meat thermometer to check for doneness—165°F (75°C) is ideal. Flip halfway through the baking for extra crunch!
-
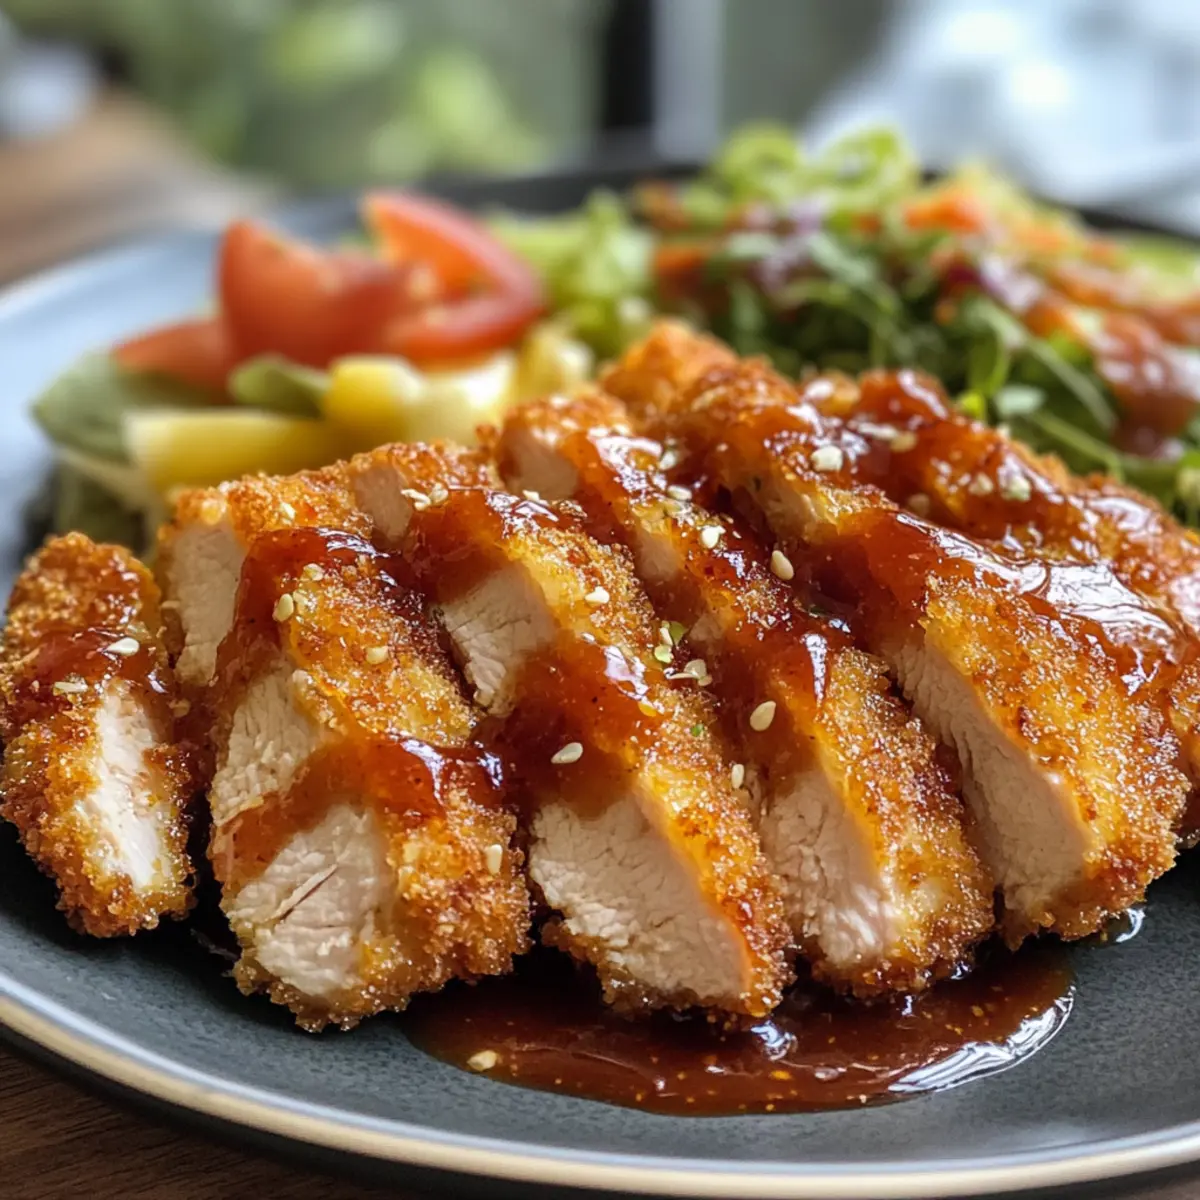
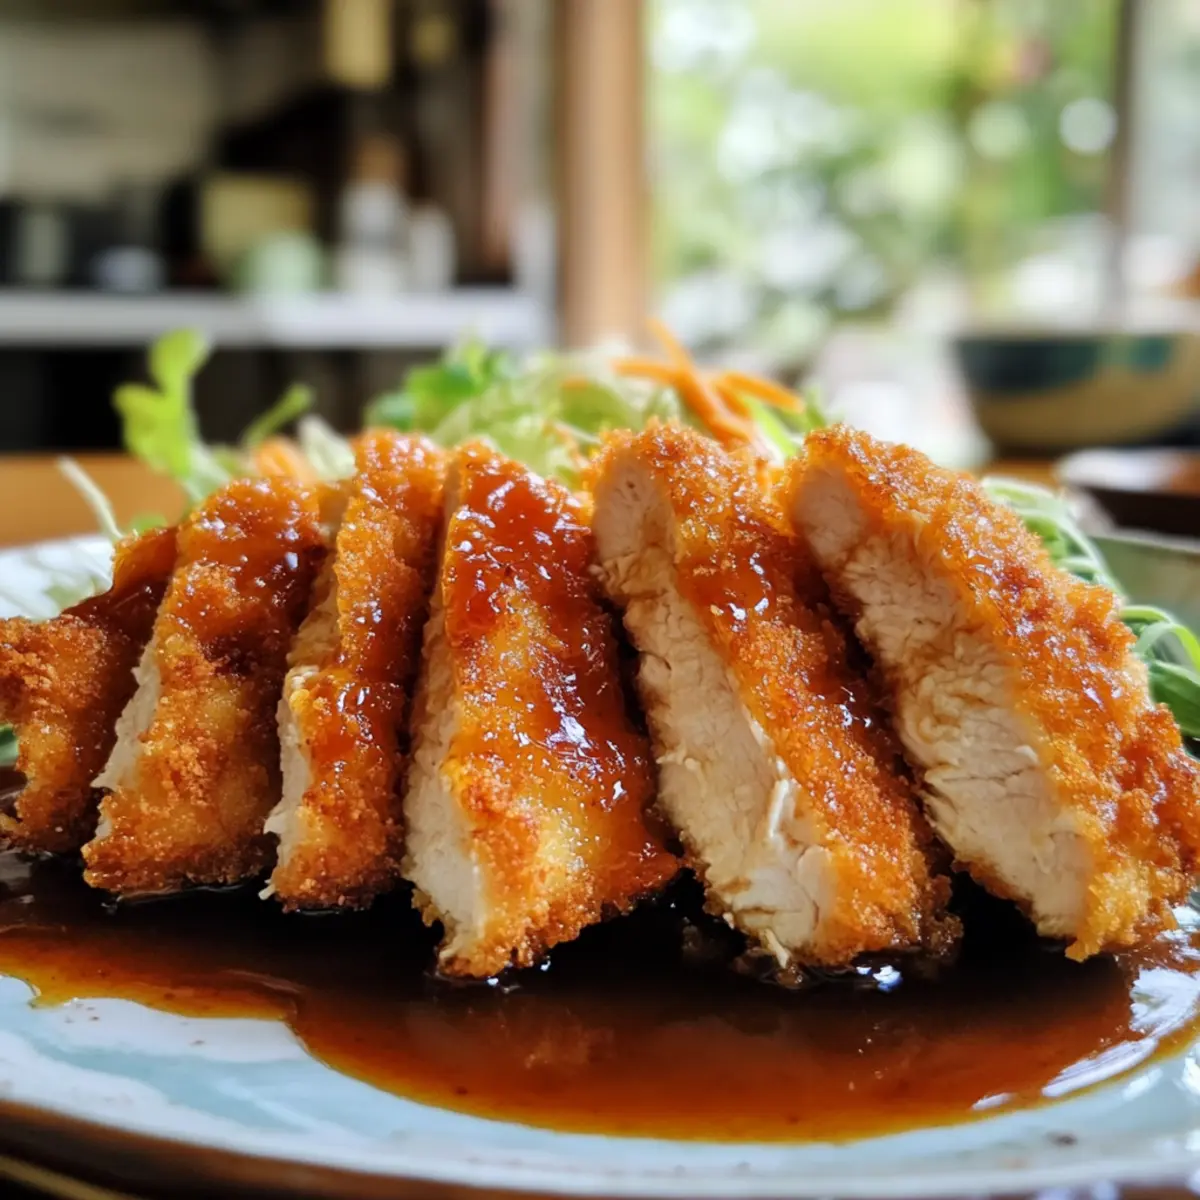
Serve & Enjoy: Once baked, allow the chicken to rest for a couple of minutes before slicing. Serve it drizzled with tonkatsu sauce over rice or steamed veggies for a delightful meal.
Optional: Serve with shredded cabbage on the side for added texture and freshness.
Exact quantities are listed in the recipe card below.
Crispy Oven-baked Chicken Katsu Variations
Feel free to customize your katsu experience with these delightful twists that cater to every taste and dietary need.
-
Protein Swap: Use pork or tofu in place of chicken for deliciously unique flavors and textures. Each option offers its own culinary charm.
-
Spicy Kick: Add a teaspoon of cayenne pepper or sriracha to your flour mixture for a flavorful heat that dances on your palate. Spice lovers will relish this fiery adaptation!
-
Herb Infusion: Mix Italian herbs or fresh herbs like parsley into the panko for an aromatic twist. It adds a lovely freshness that complements the savory notes of the katsu.
-
Zesty Citrus: Incorporate zest from a lime or lemon into the breadcrumbs for a bright, tangy flavor. This refreshing addition elevates the dish, making it perfect for summer dinners.
-
Alternative Sauces: Experiment with different sauces, like sweet chili or mustard aioli, for varied flavor profiles and an exciting culinary adventure. Your taste buds will thank you for this exploration!
-
Veggie Crunch: Top your chicken with shredded carrots or cucumbers before drizzling with sauce for added texture and a vibrant color contrast. It’s an easy way to elevate the dish visually and nutritionally.
-
Gluten-Free Delight: Use gluten-free breadcrumbs and flour to make this recipe suitable for gluten-sensitive friends and family, allowing everyone to partake in the crispy goodness without worry.
-
Nutty Twist: Add finely chopped almonds or sesame seeds to the panko before coating the chicken for a delightful crunch and a nutty flavor that wonderfully complements the katsu.
Make Ahead Options
These Crispy Oven-Baked Chicken Katsu are perfect for meal prep enthusiasts! You can season the boneless skinless chicken breasts and store them in the refrigerator for up to 24 hours before cooking. Additionally, you can set up your dredging station by arranging the flour, eggs, and panko breadcrumbs in shallow dishes the night before. To maintain quality, it’s best to coat the chicken just before baking to ensure maximum crispiness. When you’re ready to serve, simply preheat your oven, coat the chicken, and follow the baking instructions. With these make-ahead tips, you’ll have delicious, crunchy katsu with minimal effort on busy weeknights!
Expert Tips for Crispy Oven-Baked Chicken Katsu
-
Choose Panko Wisely: Use high-quality panko breadcrumbs for the best texture. Avoid regular breadcrumbs, which may become soggy rather than crispy.
-
Spray Generously: Lightly spray the coated chicken with cooking spray before baking. This ensures an ultra-crispy exterior without adding extra calories.
-
Perfect Thickness: Pound the chicken breasts to an even thickness; this helps them cook uniformly, preventing dry or uneven textures.
-
Avoid Crowding: Do not overcrowd the baking sheet; space the chicken pieces apart for even heat distribution and maximum crispiness.
-
Resting Time: After baking, allow the chicken to rest for a few minutes before slicing. This step keeps the juices locked in, ensuring tender bites with your crispy oven-baked chicken katsu.
How to Store and Freeze Crispy Oven-Baked Chicken Katsu
Fridge: Store leftovers in an airtight container for up to 3 days. This will keep your crispy oven-baked chicken katsu fresh and flavorful.
Freezer: For longer storage, freeze the chicken katsu in a single layer before transferring to an airtight bag. It can be stored for up to 2 months, preserving its crunch.
Reheating: Reheat in the oven at 350°F (175°C) for about 10-15 minutes to restore crispiness. Microwaving may result in a soggy texture, so the oven is preferred.
Serving Suggestions: Consider adding freshly made tonkatsu sauce when reheating for an extra burst of flavor, making each bite as delicious as when it was first served.
What to Serve with Crispy Oven-Baked Chicken Katsu?
Elevate your meal experience with perfect pairings that tantalize the taste buds and complement the crunchy deliciousness of Chicken Katsu.
-
Shredded Cabbage: A classic side that adds crunch and freshness, balancing the savory and crispy chicken with a light, refreshing note.
-
Steamed Jasmine Rice: Its fluffy, aromatic grains soak up the rich flavors of tonkatsu sauce, creating a delightful harmony with every bite.
-
Miso Soup: Warm and comforting, this umami-rich soup pairs beautifully, adding depth to the meal while providing a Japanese touch.
-
Pickled Vegetables: Tangy, crisp, and vibrant, they contrast the richness of the katsu, refreshing the palate with a burst of flavor.
-
Teriyaki Glazed Asparagus: The mildly sweet, sticky glaze enhances the dish, introducing a hint of smokiness that perfectly complements the chicken.
-
Green Salad with Sesame Dressing: Fresh greens drizzled with nutty dressing create a wholesome side that adds brightness and a crisp texture.
-
Japanese Beer: A light and refreshing beer pairs wonderfully, its bubbles cleansing the palate and enhancing the flavors of the katsu.
-
Green Tea Ice Cream: For dessert, this creamy yet refreshing treat rounds out the meal with a delicate sweetness that echoes the flavors of Japanese cuisine.
Crispy Oven-Baked Chicken Katsu Recipe FAQs
What kind of chicken should I use for the katsu?
Absolutely! Boneless, skinless chicken breasts are the best choice for this recipe. They cook evenly and stay juicy, making them perfect for achieving that tender inside and crispy outside. If you prefer, you can also use chicken thighs for a slightly richer flavor.
How should I store the leftovers for maximum freshness?
For the best results, store your leftovers in an airtight container in the fridge for up to 3 days. This keeps the chicken fresh and flavorful. If you find there are still some crispy bits left, you can also place a paper towel at the bottom of the container to absorb moisture and maintain crispiness.
Can I freeze the crispy oven-baked chicken katsu?
Yes, indeed! To freeze, first allow the chicken katsu to cool completely. Then, place the pieces in a single layer on a baking sheet, and freeze for about 1 hour until firm. Once solid, transfer the katsu to a freezer bag, removing as much air as possible. It can be stored for up to 2 months for best quality.
What’s the best way to reheat the chicken katsu?
To maintain that delightful crunch, I recommend reheating the chicken katsu in the oven. Preheat your oven to 350°F (175°C) and bake for about 10-15 minutes. This approach restores the crispiness without drying out the chicken. If you have some freshly made tonkatsu sauce, drizzle that on before serving for an extra flavor burst!
Are there any dietary considerations I should be aware of?
Certainly! If you’re cooking for someone with food allergies, it’s good to note that this recipe contains gluten from the panko breadcrumbs and all-purpose flour. For a gluten-free version, you can substitute gluten-free breadcrumbs. Also, if you’re considering different proteins, tofu works beautifully and keeps the dish entirely plant-based.
What should I do if the coating doesn’t stick well to the chicken?
Very importantly, if you find that the coating isn’t adhering properly, check the dredging process. Ensure each piece of chicken is lightly coated in flour before dipping in the beaten eggs and then panko breadcrumbs. Press the breadcrumbs onto the chicken firmly as you coat it to ensure they stick. Pounding the chicken to an even thickness can also help avoid this issue, resulting in better adhesion!

Crispy Oven-Baked Chicken Katsu Recipe - Easy and Guilt-Free Delight
Ingredients
Equipment
Method
- Preheat your oven to 400°F (200°C) and spray a baking sheet with nonstick cooking spray.
- Season the chicken breasts with salt and pepper. Consider pounding them to an even thickness.
- Set up a dredging station with flour, whisked eggs, and panko in separate shallow dishes.
- Coat each chicken breast in flour, then dip into the egg wash, and finish with panko breadcrumbs.
- Bake on the prepared sheet for 20-25 minutes until golden brown, flipping halfway through.
- Let the chicken rest for a couple of minutes before slicing, then serve with tonkatsu sauce over rice or veggies.

[…] will remind you of home while giving your palate something new to relish, similar to dishes like Baked Chicken Katsu. Enjoy cooking a dish that feels like a warm hug on your […]