
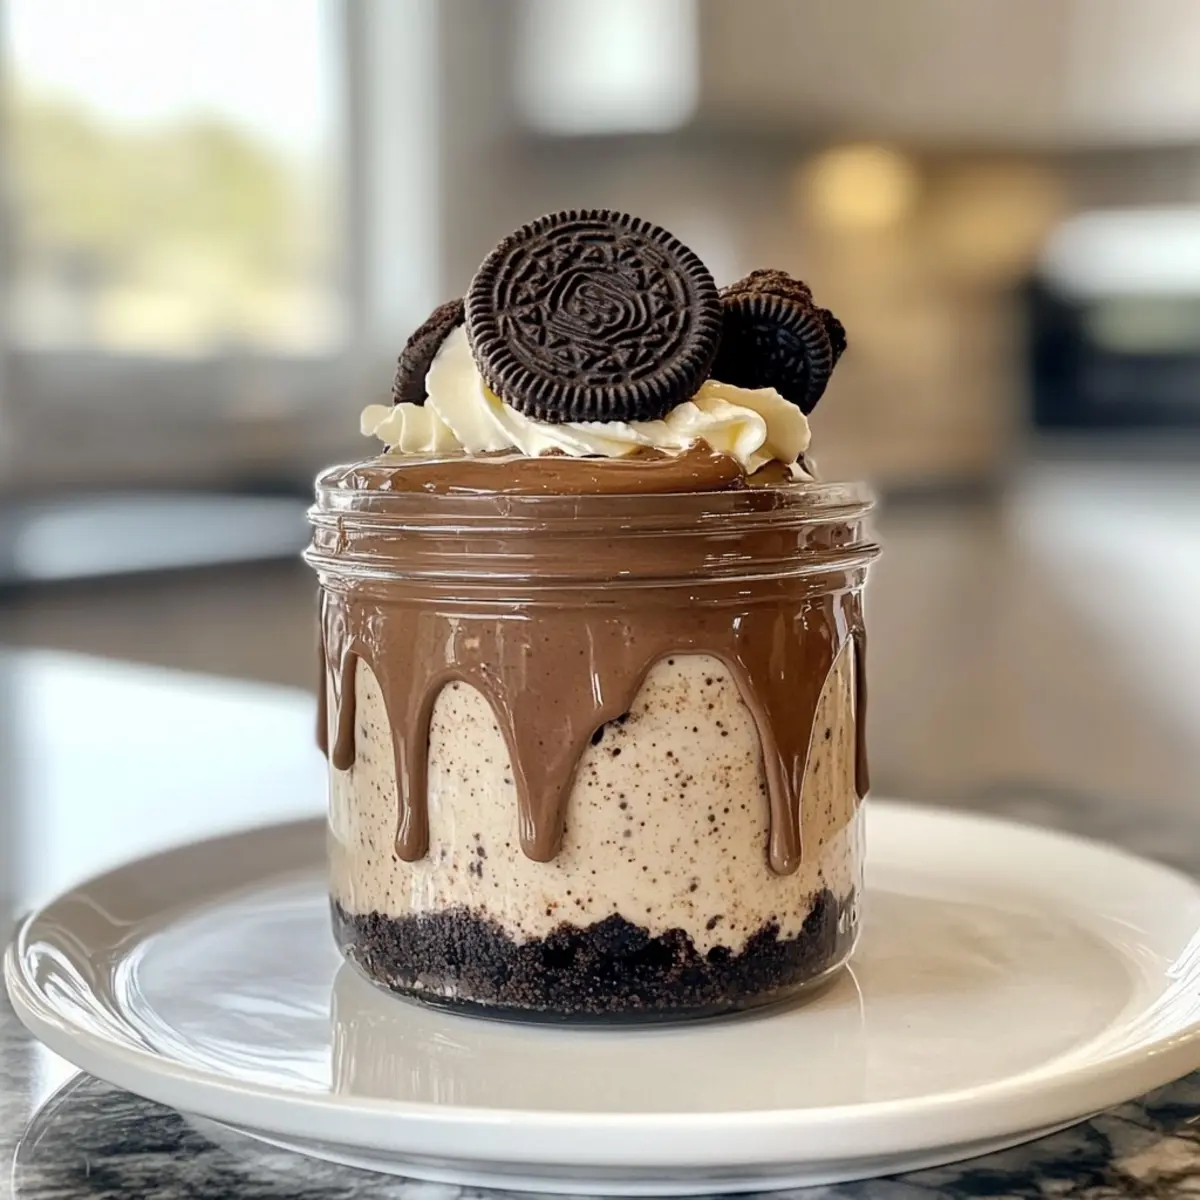
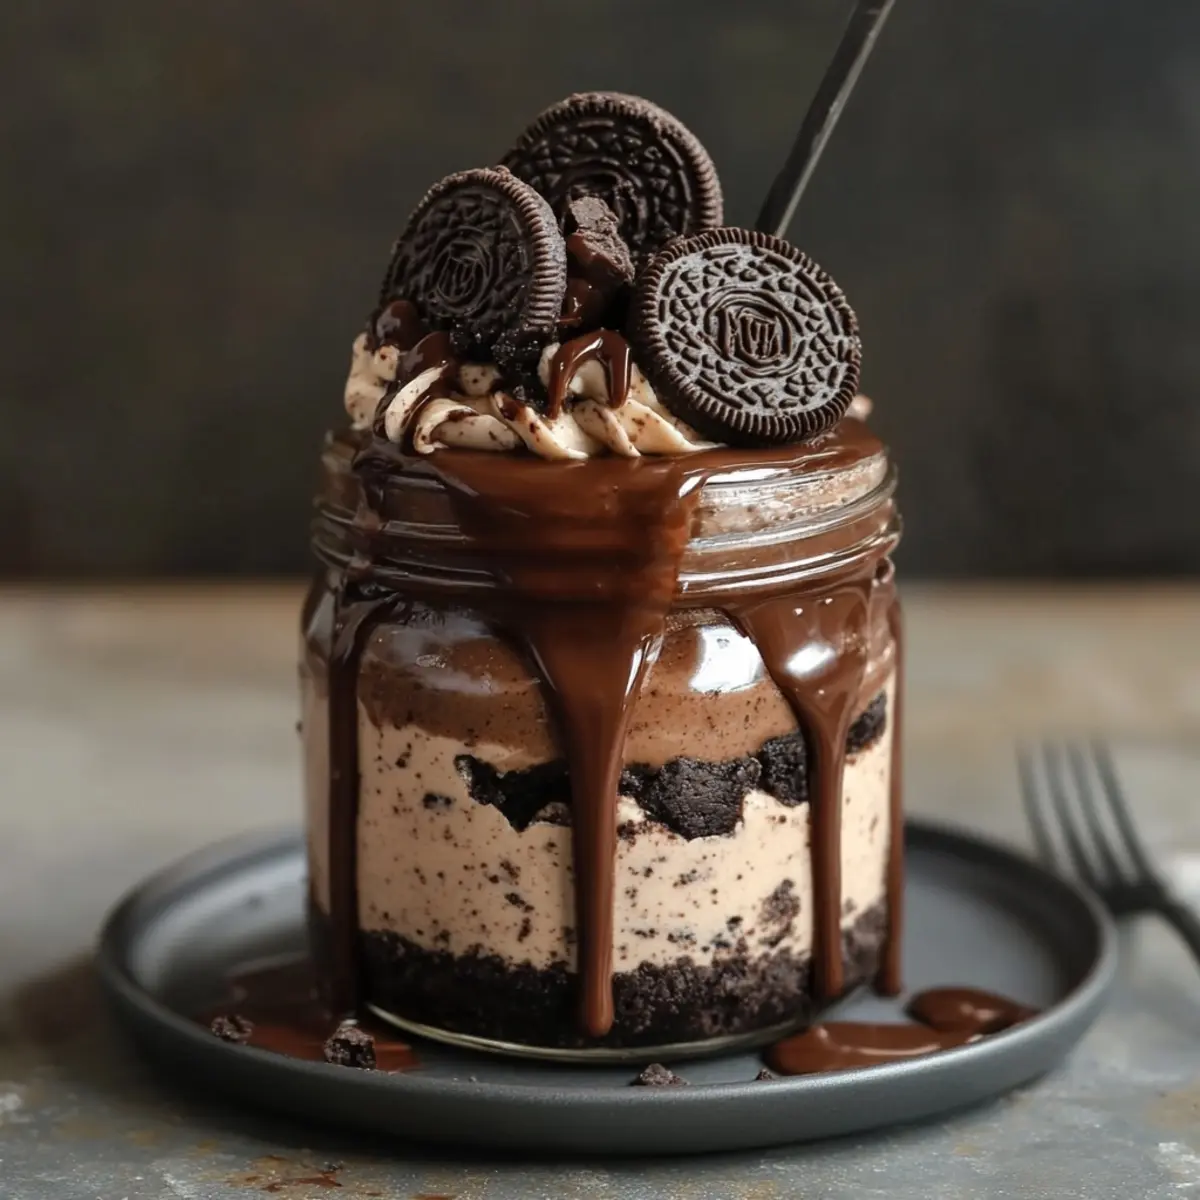
Picture this: A warm afternoon, the sun streaming through the window, and the tantalizing aroma of chocolate and cream wafting through the kitchen. That’s the moment I found myself thinking, why not whip up something decadent yet effortless? Enter my No-Bake Nutella Oreo Cheesecake Jars!
These delightful little creations are not just your average dessert; they’re a celebration of textures and flavors that come together in a matter of minutes. With a rich Nutella-infused filling layered over a buttery Oreo crust, each spoonful is a creamy dream come true. And the best part? You can enjoy these indulgent jars without turning on the oven—a lifesaver for those warm-weather gatherings or simply when you’re craving a sweet treat without the fuss!
Perfect for both casual lunches and fancy dinner parties, these jars promise to impress without the stress. So grab those Oreos and let’s dive into this easy, no-bake recipe that’s sure to become a household favorite!
Why You’ll Love These No-Bake Nutella Oreo Cheesecake Jars
Decadent and Easy: The No-Bake Nutella Oreo Cheesecake Jar is a true crowd-pleaser, combining rich flavors with minimal effort.
Quick Preparation: Whip these up in just 15 minutes, making them perfect for last-minute gatherings or a sweet craving.
Versatile Delight: Feel free to swap ingredients—try peanut butter or different cookies for a fun twist on this classic.
Lovely Presentation: These jars are not only delicious but visually stunning, adding a charming touch to any table setting.
Gluten-Free Option: With just a simple switch to gluten-free Oreos, everyone can indulge without worry.
Get ready to impress your family and friends—these jars are destined to become a hit! And if you’re in the mood for more creamy delights, don’t miss my fantastic [Peanut Butter Pie](https://stellarrecipe.com/unbelievable-creamy-peanut-butter-pie/)!
No-Bake Nutella Oreo Cheesecake Jar Ingredients
For the Crust
- Oreos – a crunchy base that holds everything together; substitute with gluten-free Oreos for a gluten-free version.
- Butter – binds the Oreo crumbs together for a sturdy crust; use any unsalted variety for best results.
For the Filling
- Cream Cheese – gives a creamy texture and structure to the cheesecake filling; full-fat is recommended for richness.
- Powdered Sugar – adds sweetness and helps achieve a smooth filling that complements the Nutella.
- Vanilla Extract – enhances the overall flavor in the cheesecake; pure vanilla provides the best taste.
- Heavy Cream – whipped to create a light and airy filling; can substitute with double cream or thawed whipped topping.
- Nutella – the star of the show that infuses rich chocolate-hazelnut flavor into the cheesecake; for a healthier option, consider homemade Nutella.
For the Topping
- Heavy Cream – whipped to soft peaks for a fluffy topping; an essential feature of the sundae-like finish.
- Semi-Sweet Chocolate – finely chopped for an optional garnish; this adds visual appeal and enhances the chocolate flavor.
How to Make No-Bake Nutella Oreo Cheesecake Jars
- Prepare Crust: Begin by blitzing 16 Oreos in a food processor until they resemble fine crumbs. Combine the crumbled Oreos with ¼ cup melted butter and mix until all crumbs are coated. Pack two tablespoons of this mixture tightly into the bottom of each jar.
- Make Filling: In a mixing bowl, beat together 8 ounces of softened cream cheese, ¾ cup powdered sugar, and 1½ teaspoons of vanilla extract until the mixture is smooth and creamy.
- Whip Cream: In a separate bowl, whip 2 cups of heavy cream until stiff peaks form. This will give your cheesecake filling a light and airy texture, so be sure to monitor it closely!
- Combine Nutella: Gently fold ¾ cup of Nutella into the cream cheese mixture until it’s just combined. Avoid overmixing to keep that lovely airy texture you’ve created with the whipped cream.
- Fill Jars: Transfer the filling into a piping bag (or use a spoon) and carefully pipe the Nutella cheesecake mixture into your jars, layering it over the crust.
- Prepare Topping: Whip 1 cup of heavy cream until it reaches soft peaks. Pipe this whipped cream on top of each cheesecake jar for a heavenly finishing touch.
- Finish: Sprinkle finely chopped semi-sweet chocolate on top for a touch of elegance. You can serve immediately or refrigerate for a bit to let the flavors meld.
Optional: Top with crushed Oreos for extra crunch!
Exact quantities are listed in the recipe card below.

What to Serve with No-Bake Nutella Oreo Cheesecake Jars?
Looking to create a delightful meal experience alongside your sweet treats?
- Fresh Berries: Bright strawberries or raspberries add a tart contrast to the rich cheesecake, enhancing every bite with a burst of freshness. A sprinkle of powdered sugar can elevate their appeal too!
- Coffee or Espresso: A warm cup of coffee or a shot of rich espresso complements the chocolate-hazelnut flavor, making each spoonful of cheesecake even more indulgent. It’s the perfect afternoon pick-me-up!
- Chocolate Sauce Drizzle: Elevate your jars with a warm chocolate sauce drizzle, which intensifies the dessert experience and adds layers of gooey goodness to the silky cheesecake. Dive in to enjoy the magic!
- Coconut Whipped Cream: Swap regular whipped cream for coconut whipped cream to impart a tropical twist that pairs beautifully with the Nutella’s richness. It’s like a dreamy vacation in a jar!
- Savory Cheese Plate: Balance out the sweetness by serving a selection of tangy cheeses like goat cheese or sharp cheddar. The savory elements provide a delightful contrast, making for a sophisticated dessert spread.
- Mini Fruit Tarts: Light, flaky fruit tarts provide a refreshing texture and flavor, creating a lovely contrast to the creamy jars while also impressing your guests with their charming presentation.
- Sparkling Water with Lemon: Refresh guests with bubbly sparkling water infused with lemon or mint. This delightful sip cleanses the palate and enhances the sweetness of the cheesecake jars, making every bite feel light and refreshing.
Expert Tips for No-Bake Nutella Oreo Cheesecake Jars
- Cream Cheese Temperature: Make sure your cream cheese is at room temperature for a smooth filling. Cold cream cheese can lead to lumps in your No-Bake Nutella Oreo Cheesecake Jar.
- Gentle Folding: When incorporating heavy cream and Nutella, be gentle. Overmixing can deflate the light, airy texture you’re aiming for in the filling.
- Jar Size Matters: Use small jars for individual servings, but be mindful of size; too large, and you risk an overwhelming dessert. Aim for about 8-ounce jars for perfect portions.
- Chill Time: For best flavor and texture, refrigerate your jars for at least an hour before serving. This allows the flavors to deepen and the filling to set properly.
- Avoid Over-Whipping: When whipping cream, stop once you reach stiff peaks. Over-whipped cream can curdle and won’t blend well into your filling.
- Clean Tools: If you’re making a gluten-free version, ensure all utensils and bowls are entirely gluten-free to avoid contamination.
No-Bake Nutella Oreo Cheesecake Jar Variations
Feel free to let your creativity shine by making these delightful desserts your own!
- Nut Allergy-Friendly: Swap Nutella for sunflower seed butter for a nut-free alternative that’s equally delightful.
- Dairy-Free Delight: Use a dairy-free cream cheese and coconut whipped cream for a completely dairy-free version.
- Fruit Twist: Layer fresh raspberries or strawberries between the crust and filling for a refreshing fruity contrast.
- Cookie Crust Options: Try graham crackers or digestive biscuits instead of Oreos for a different flavor profile while maintaining that crunch.
- Spice It Up: Add a pinch of cinnamon or espresso powder to the filling for an unexpected flavor boost that enhances the chocolate richness.
- Caramel Drizzle: Drizzle some caramel sauce over the top for added sweetness and a beautiful presentation.
- Fruity Cream Topping: Top your jars with whipped cream mixed with fruit puree for a burst of fresh flavor and color.
- Chocolate Lovers: Incorporate chopped nuts and chocolate chips into the filling for an exciting texture contrast in each bite.
Explore these variations to personalize your jars and delight your taste buds!
Storage Tips for No-Bake Nutella Oreo Cheesecake Jars
Fridge: Store the jars in the refrigerator for up to 3 days; ensure they’re covered or sealed tightly to prevent drying out.
Freezer: If you need to freeze them, place the jars in an airtight container and freeze for up to 1 month; note that the texture may change slightly upon thawing.
Reheating: For the best taste and texture, enjoy them chilled straight from the fridge without reheating, as these jars are meant to be served cold.
Topping Freshness: Add any whipped cream or chocolate topping right before serving for optimal freshness; this ensures your No-Bake Nutella Oreo Cheesecake Jars remain visually appealing and delicious.
Make Ahead Options
Preparing these delightful No-Bake Nutella Oreo Cheesecake Jars in advance is a fantastic way to save time, especially during busy weeknights or gatherings! You can make the crust and filling up to 3 days ahead of time. Simply follow the first five steps of the recipe, then store the jars in the refrigerator without the whipped topping. To maintain the creamy texture and flavor, ensure they are sealed tightly (to prevent any unwanted drying). When you’re ready to serve, whip up the cream topping, pipe it over the jars, sprinkle with chopped chocolate, and enjoy your beautifully layered dessert that tastes just as fresh as when you first made it!

No-Bake Nutella Oreo Cheesecake Jars Recipe FAQs
How do I choose ripe ingredients for this recipe?
Absolutely! For this recipe, ensure your cream cheese is at room temperature for a smooth and lump-free filling. When selecting Nutella, go for a fresh jar without any hardening or oil separation on top. If using fruit as a topping, pick the ripest berries—look for vibrant colors and firm textures.
What are the best storage methods and duration for these jars?
You can store your No-Bake Nutella Oreo Cheesecake Jars in the refrigerator for up to 3 days. Make sure they are covered or sealed tightly to prevent them from drying out. If you want to keep them longer, consider placing them in an airtight container in the freezer, where they’ll last for up to a month.
Can I freeze the No-Bake Nutella Oreo Cheesecake Jars?
Yes, you can freeze these jars! Here’s how: After filling the jars and before adding the whipped cream topping, seal them tightly in an airtight container. They can be stored in the freezer for up to 1 month. For best results, allow them to thaw in the refrigerator overnight before serving, and add the whipped cream topping fresh.
What should I do if my whipped cream doesn’t reach stiff peaks?
If your whipped cream isn’t forming stiff peaks, it could be due to a couple of factors: the cream may be too warm or not have enough fat content. Make sure you’re using cold heavy cream and use a chilled bowl for whipping. If it still fails, you can add a stabilizing agent like a tablespoon of powdered sugar or cornstarch while whipping, which can help achieve that airy texture.
Are there any dietary considerations for this recipe?
Very! This recipe can be made gluten-free by substituting regular Oreos with gluten-free Oreos. Additionally, check the cream cheese and whipped topping for additives if you have certain dietary restrictions or allergies. For a nut allergy-friendly version, simply replace Nutella with sunflower seed butter or a safe nut-free spread.
How do I ensure the best texture and taste when preparing these jars?
To ensure your No-Bake Nutella Oreo Cheesecake Jars are creamy and smooth, start with all your ingredients at room temperature. When mixing in the whipped cream, it’s vital to fold gently to maintain the fluffy texture. Avoid over-whipping the cream; stop when you reach stiff peaks and blend it with the Nutella mixture lightly to keep airiness in the filling.
Irresistibly Indulgent No-Bake Nutella Oreo Cheesecake Jars
Ingredients
Equipment
Method
- Prepare Crust: Blitz 16 Oreos in a food processor until they resemble fine crumbs. Combine with ¼ cup melted butter and mix until coated. Pack 2 tablespoons into each jar.
- Make Filling: Beat together 8 ounces cream cheese, ¾ cup powdered sugar, and 1½ teaspoons vanilla until smooth.
- Whip Cream: Whip 2 cups heavy cream until stiff peaks form.
- Combine Nutella: Gently fold ¾ cup Nutella into the cream cheese mixture until combined.
- Fill Jars: Pipe the Nutella cheesecake mixture into the jars, layering it over the crust.
- Prepare Topping: Whip 1 cup heavy cream until soft peaks form and pipe on top of each jar.
- Finish: Sprinkle semi-sweet chocolate on top for garnish. Serve immediately or refrigerate.
Notes

Leave a Comment