
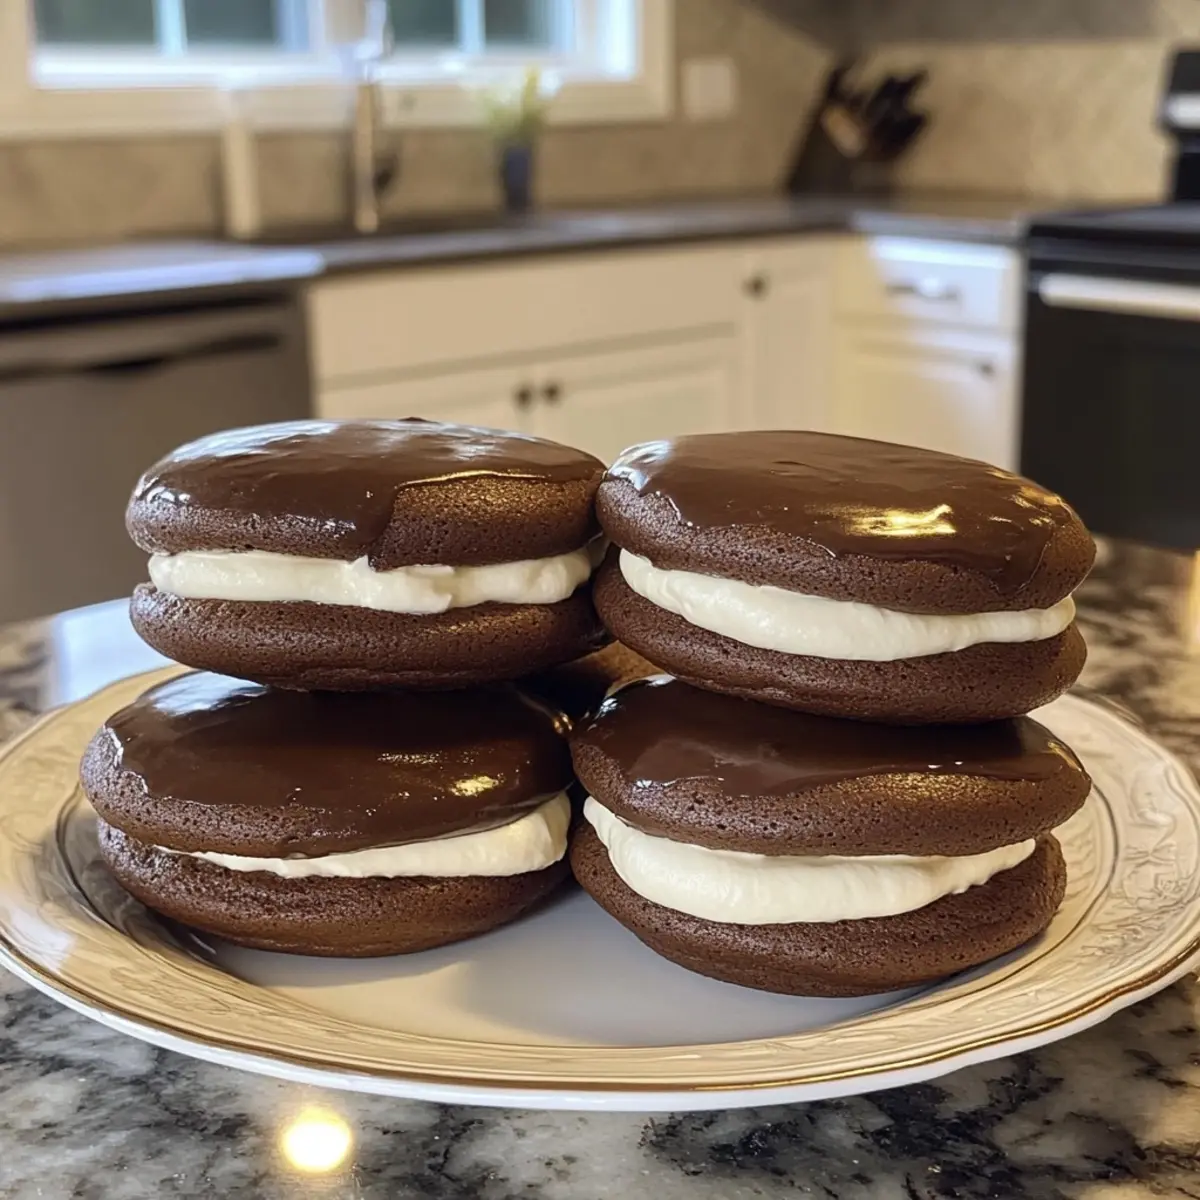
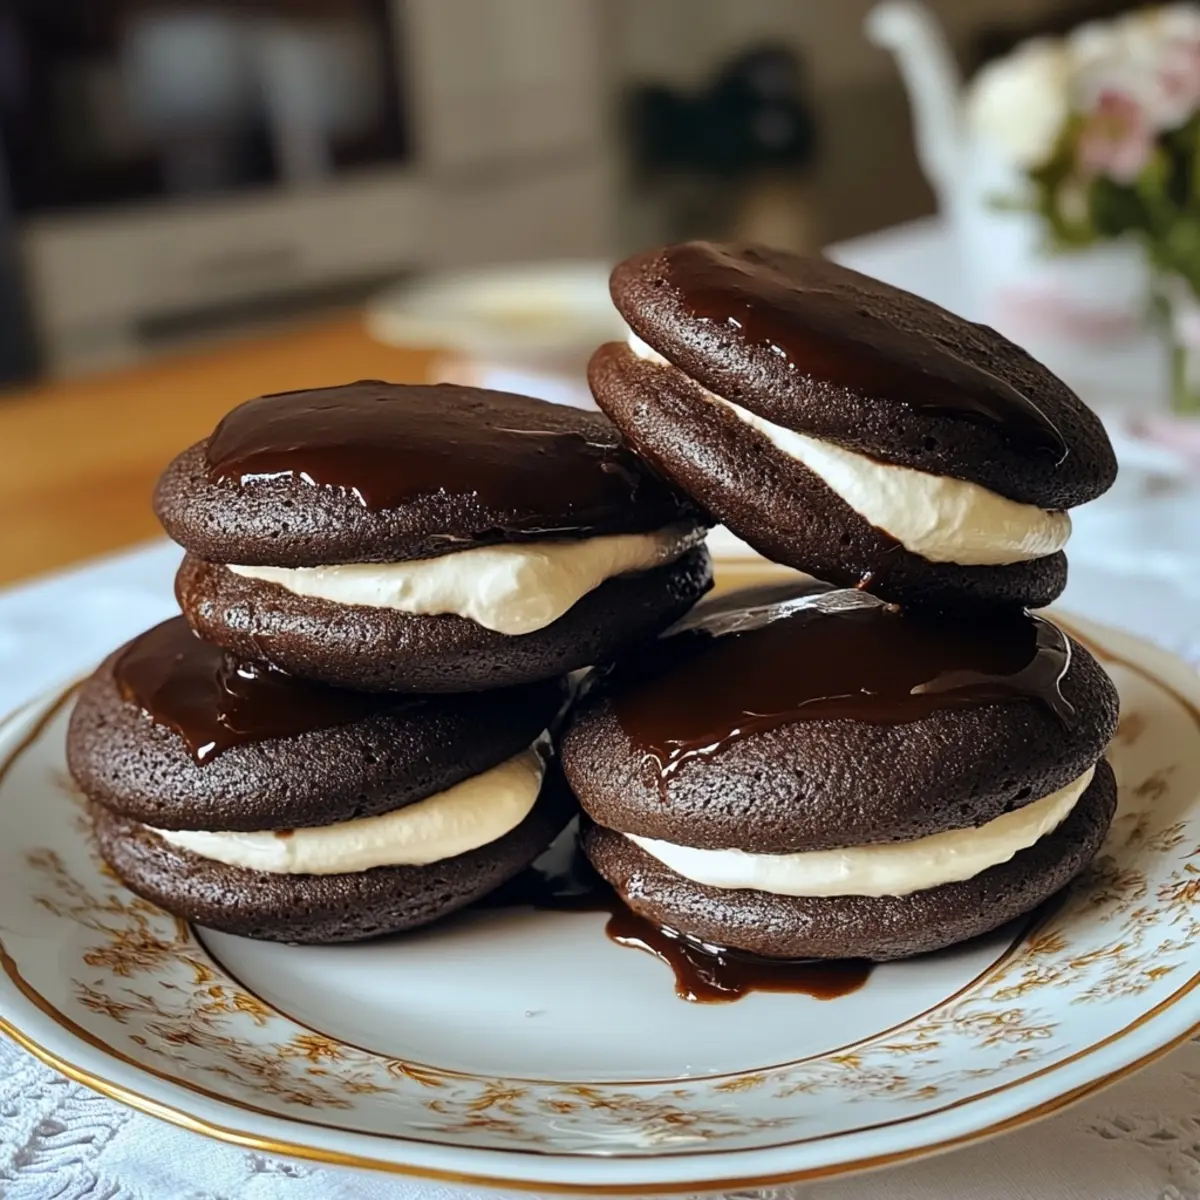
There’s something undeniably comforting about the combination of soft chocolate cookies and a creamy, dreamy filling. Indulge in decadent Classic Whoopie Pies, a nostalgic treat that brings out the inner child in all of us. Whether it’s a bustling family gathering or a quiet evening on the couch, these delightful morsels of goodness are perfect for sharing (or keeping all to yourself!).
As I rummaged through my pantry recently, I realized I had all the ingredients to whip up these delightful pies. It felt like the right moment to revisit a childhood favorite, and I couldn’t help but feel excited imagining the smiles they’d bring to my loved ones’ faces. What’s more? Beyond the classic recipe, you can customize them for gluten-free, dairy-free, or even vegan diets, allowing everyone to join in on the fun.
So, let’s dive into the world of Whoopie Pies, where nostalgia meets creativity, and every bite is a sweet trip down memory lane!
Indulge in Decadent Classic Whoopie Pies?
Nostalgic Charm: Whoopie Pies are a childhood favorite that instantly transports you to sweet memories.
Customization Galore: Each pie can be tailored to suit gluten-free, dairy-free, or vegan diets, ensuring everyone can enjoy.
Simplicity: With just a handful of ingredients, these delightful treats come together easily, even for novice bakers.
Flavor Fusion: The soft chocolate cookie paired with a creamy filling creates a delightful taste experience that won’t be forgotten.
Crowd-Pleasing Delight: Perfect for gatherings or cozy evenings, these treats are sure to bring smiles to all faces.
Creative Variations: Experiment with fillings like peanut butter or fruity flavors, making them unique to your style! If you’re seeking more inspiration, check out my Moist Decadent Pear recipe for another fantastic treat!
Indulge in Decadent Classic Whoopie Pies Ingredients
• Dive into the magic of Classic Whoopie Pies with these essential ingredients that make this nostalgic treat a delight!
For the Cookies
- All-Purpose Flour – Provides structure; swap with a gluten-free flour blend for a gluten-free option.
- Cocoa Powder – Adds rich chocolate flavor; Dutch-processed cocoa gives deeper notes.
- Baking Soda – Acts as a leavening agent; always check for freshness to ensure the cookies rise properly.
- Salt – Enhances the overall flavor profile.
- Granulated Sugar – Contributes sweetness and texture; coconut sugar offers a unique sweetness alternative.
- Eggs – Bind the ingredients together; replace with flax eggs for a vegan version.
- Vanilla Extract – Boosts the flavor; opt for pure extract for the best taste.
- Unsalted Butter – Adds moisture and richness; use plant-based butter to make it dairy-free.
- Milk – Adjusts batter consistency; almond or oat milk work well as non-dairy substitutes.
For the Filling
- Powdered Sugar – Provides sweetness and a smooth texture for the filling.
- Marshmallow Fluff – Creates a creamy filling base; make your own for a fresher taste!
These ingredients are key to bringing forth the joyous experience of classic whoopie pies that you’ll love making and sharing!
How to Make Classic Whoopie Pies
-
Preheat the oven to 350°F (175°C) and prepare your baking sheets by lining them with parchment paper. This step ensures the cookies won’t stick and bake evenly.
-
Whisk together all-purpose flour, cocoa powder, baking soda, and salt in a large bowl. Set this mixture aside as it holds the dry essentials for our cookie batter.
-
Cream the softened butter and granulated sugar in another bowl until fluffy, around 3 minutes. Slowly add the eggs one at a time, followed by the vanilla extract, ensuring everything is well mixed.
-
Combine the dry ingredients with the wet ingredients, mixing gently. Add milk as needed to achieve a smooth batter that should be thick yet pourable.
-
Spoon rounded tablespoons of batter onto the prepared baking sheets, making sure to leave space between each dollop. Bake for approximately 10 minutes until the cookies feel slightly springy to the touch.
-
Cool the cookies completely on a wire rack before proceeding to the filling. This prevents the filling from melting and ensures perfect pies.
-
Whip together the powdered sugar, marshmallow fluff, softened butter, and vanilla extract in a bowl until creamy. The filling should be smooth and fluffy.
-
Fill one cookie with a generous amount of the marshmallow filling, then top it with another cookie to create a pie. Gently press down to spread the filling slightly.
Optional: Dust the finished pies with cocoa powder or powdered sugar for an elegant touch.
Exact quantities are listed in the recipe card below.
Expert Tips for Classic Whoopie Pies
- Cool Completely: Always let cookies cool fully before filling to prevent the creamy filling from melting, ensuring your whoopie pies maintain their delightful shape.
- Fluffier Filling: For a creamier, fluffier filling, whip the butter and powdered sugar longer, allowing air to incorporate nicely for that perfect texture.
- Measure Ingredients: Accurately measuring ingredients is essential; too much flour can lead to dry cookies. Use a kitchen scale for the best results.
- Fresh Baking Soda: Ensure your baking soda is fresh for an optimal rise—check the expiration date to avoid flat cookies.
- Variations Galore: Embrace creativity! Feel free to experiment with flavors and fillings, such as adding peanut butter or creating a vegan option to cater to various diets.
- Watch the Bake Time: Adjust baking time if cookies appear too soft; they should hold together when lightly pressed, guaranteeing a pleasurable bite of indulgence in your Classic Whoopie Pies.
Storage Tips for Classic Whoopie Pies
Room Temperature: Store your Classic Whoopie Pies in an airtight container at room temperature for up to 3 days to keep them soft and fresh.
Fridge: If you want to keep them longer, refrigerate the pies in an airtight container for up to a week. Just allow them to return to room temperature before serving for the best flavor.
Freezer: For longer storage, freeze the whoopie pies individually wrapped in plastic wrap and stored in a freezer bag for up to 3 months. Thaw at room temperature before enjoying.
Reheating: If desired, microwave a pie for about 10-15 seconds to bring back its soft texture before indulging in this nostalgic treat!
Make Ahead Options
These Classic Whoopie Pies are perfect for busy home cooks looking to save time! You can prepare the cookies up to 3 days in advance. Just bake the cookies and let them cool completely; then store them in an airtight container at room temperature to maintain their soft texture. The filling can also be made up to 24 hours ahead—simply refrigerate it until you’re ready to assemble. When you’re ready to serve, fill the cookies with the creamy marshmallow filling and enjoy a delightful, freshly made treat that remains just as delicious. This way, you can easily satisfy your sweet cravings without the last-minute stress!
What to Serve with Classic Whoopie Pies?
Make your dessert experience even more delightful by pairing these playful treats with complementary sides!
-
Cold Milk: The classic choice! A glass of cold milk perfectly enhances the chocolate flavor and adds a creamy contrast to the sweet filling.
-
Coffee or Espresso: Sip on a rich cup of coffee or espresso. The bitterness balances the sweetness and offers a comforting moment with each bite.
-
Fresh Berries: Serve alongside a medley of fresh berries for a refreshing twist. The tartness beautifully contrasts the sweetness of the Whoopie Pies.
-
Ice Cream: A scoop of vanilla or mint chocolate chip ice cream creates a decadent sundae experience. Enjoy the creaminess that pairs oh-so-well with the chocolatey cookies!
-
Whipped Cream: Lightly dollop fresh whipped cream on the side. Its airy texture complements the filling, making each mouthful delightfully indulgent.
-
Fruit Compote: Drizzle warm fruit compote over your Whoopie Pies for a fruity zing. This adds brightness and a touch of warmth to your dessert table.
Feel free to mix and match these ideas for a wonderful dessert spread that resonates with the spirit of nostalgia!
Whoopie Pie Variations
Get ready to customize these delightful treats to fit every palate and preference!
- Gluten-Free: Swap all-purpose flour for a gluten-free flour blend to enjoy the same amazing texture without the gluten.
- Dairy-Free: Use plant-based butter and almond or oat milk; these simple substitutions yield a deliciously creamy filling without dairy.
- Vegan: Replace eggs with flax eggs and use dairy-free milk in the cake batter for a compassionate twist on this classic favorite.
- Nutty Crunch: Stir in finely chopped nuts or crunchy granola into the filling for a delightful texture boost that adds a satisfying crunch.
- Fruity Twist: Mix in some fruit preserves or puree into the filling for a refreshing flavor burst, perfect for summer gatherings.
- Spiced Delight: Add a teaspoon of pumpkin spice or a dash of cinnamon to the cookie batter for a warm, cozy flavor kick—perfect for fall!
- Chocolate Overload: For those who can’t get enough chocolate, fold mini chocolate chips into the cookie dough for extra chocolatey goodness with every bite.
- Zesty Finish: A hint of orange or lemon zest in the filling brings a bright nuance that elevates the overall flavor profile, balancing sweetness beautifully.
With each of these variations, you’ll find a new way to enjoy the nostalgia of Whoopie Pies—making them your very own!
Classic Whoopie Pies Recipe FAQs
What type of cocoa powder should I use for the best flavor?
I recommend using Dutch-processed cocoa powder for a deeper chocolate flavor. It tends to have a smoother and richer taste compared to regular cocoa powder. If unavailable, regular unsweetened cocoa will still yield delicious results!
How should I store my Classic Whoopie Pies?
Store your Classic Whoopie Pies in an airtight container at room temperature for up to 3 days. If you want them to last longer, refrigerate them for up to a week. Just allow them to come back to room temperature before serving for the best flavor!
Can I freeze Classic Whoopie Pies, and how should I do it?
Absolutely! To freeze, wrap each whoopie pie individually in plastic wrap and place them in a freezer bag. They can be stored for up to 3 months. To enjoy later, simply thaw them at room temperature for a couple of hours. If you prefer a warm treat, pop them in the microwave for about 10-15 seconds!
How can I make Classic Whoopie Pies gluten-free?
To make gluten-free Whoopie Pies, simply substitute the all-purpose flour with a good-quality gluten-free flour blend. I often suggest using a blend with xanthan gum for better structure. This keeps the texture soft and ensures that you don’t lose the classic charm of the pies!
What if my filling is too runny?
If you find your marshmallow filling is too runny, you can fix this by adding a tablespoon of powdered sugar at a time until you reach the desired consistency. If you want it fluffier, ensure you whip the butter and sugar longer to incorporate more air, resulting in a delightful creamy filling.
Can I use alternatives for the eggs in this recipe?
Certainly! For a vegan option, you can replace each egg with a flax egg. To make a flax egg, mix 1 tablespoon of ground flaxseed with 2.5 tablespoons of water and let it sit for about 5 minutes until it thickens. This is a great and easy way to maintain the binding quality needed in the cookies!
Indulge in Decadent Classic Whoopie Pies: A Sweet Nostalgia
Ingredients
Equipment
Method
- Preheat the oven to 350°F (175°C) and prepare your baking sheets by lining them with parchment paper.
- Whisk together flour, cocoa powder, baking soda, and salt in a large bowl. Set aside.
- Cream the butter and sugar until fluffy. Add eggs one at a time, followed by the vanilla extract.
- Combine the dry ingredients with the wet ingredients, mixing gently. Add milk as needed for consistency.
- Spoon rounded tablespoons of batter on prepared sheets, leaving space in between. Bake for approximately 10 minutes.
- Cool cookies completely on a wire rack.
- Whip together powdered sugar, marshmallow fluff, butter, and vanilla extract until creamy.
- Fill one cookie with marshmallow filling, top with another cookie, and gently press down.
Notes


Leave a Comment